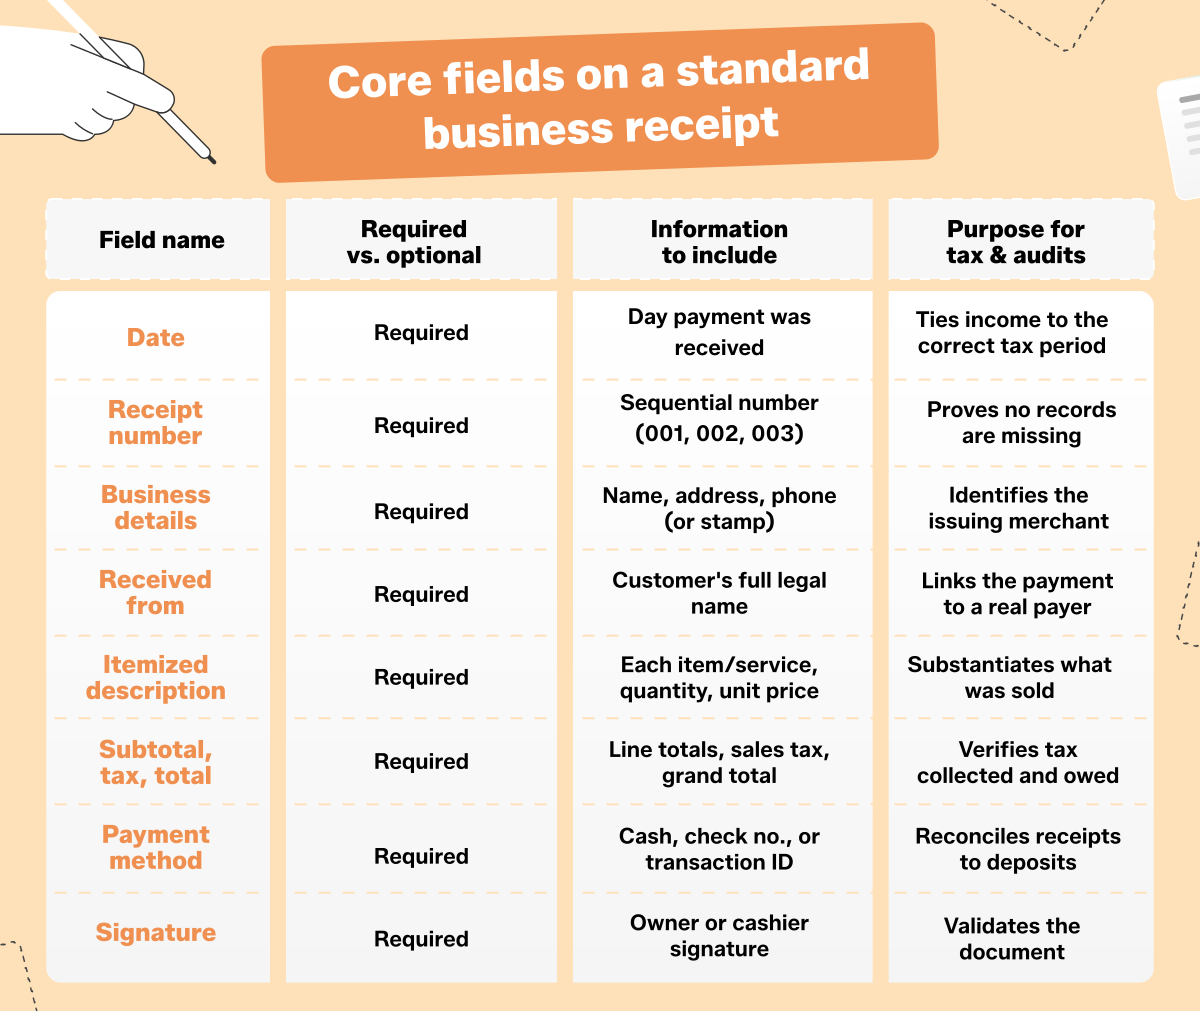
Step-by-step: How to fill out a receipt book
Work chronologically down the receipt page, from the top header to the signature line, so nothing gets skipped.
Step 1: Record the date and receipt number
Write the date the payment was received at the top of the slip. Then confirm the receipt number — these must stay in strict chronological order. If your book does not have pre-printed numbers, write them yourself in a clean numerical sequence (001, 002, 003) and never reuse or skip a number. Consistent dating and numbering are what let you (and an auditor) reconstruct a day's takings later; a gap in the sequence looks like a hidden or deleted sale, even when the cause was innocent.
Fill out the top section with your business name, address, and phone number in the header (a custom company rubber stamp speeds this up and keeps it legible). Next to "Received From," write the customer's full legal name rather than a generic label like "Cash Customer" — vague payer names are one of the first things an auditor flags. If the sale is to another business, add their company name and, where relevant, a purchase-order or account reference so the receipt can be matched to their records as well as yours.
Step 3: Itemize goods, services, and quantities
In the central table, list each item or service on its own line. Be specific: "3x Custom Wooden Chair Repairs" tells a far clearer story than a single word like "Repairs." Multiply the quantity by the unit price to calculate each line-item total, and keep your descriptions detailed enough that the receipt makes sense months later. Detailed line items also help you and your customer resolve disputes quickly — if someone questions a charge, a clear description and quantity settle the matter without digging through other records.
Step 4: Calculate the subtotal, taxes, and grand total
Now handle the math in a simple progression:
- Add up all line-item totals to reach the Subtotal.
- Add any applicable local sales tax, shipping fees, or service charges.
- Subtract any discounts or deposits already paid in advance.
State the final figure clearly: Grand Total = Subtotal + Taxes + Fees − Discounts. Double-check the arithmetic before you tear anything out.
Step 5: Mark the payment method and sign
Check the appropriate box for the payment type: Cash, Check (write the check number for tracking), or Card/Transfer (record the transaction ID). Finally, have the business owner or cashier sign the signature line to validate the document. An unsigned receipt is an incomplete record. Recording the payment method matters at reconciliation time, too: it lets you match each receipt against your cash drawer, bank deposits, and card processor statements so the totals line up cleanly at the end of the day.
Carbon copy handling, color coding, and void protocols
Knowing the fields is only half the job. The physical mechanics of a receipt book — and how you correct mistakes — are what separate clean books from an audit headache.
The cardboard divider rule (preventing carbon bleed-through)
Modern receipt books use NCR (No Carbon Required) paper coated with a micro-encapsulated dye that reacts to the pressure of a ballpoint pen. That is convenient — until you forget the stiff cardboard divider flap. If you write on the top page without slipping the cardboard behind the current duplicate (or triplicate) set, the pen pressure transfers straight through onto the next 5 to 10 blank pages, ruining a large chunk of the book. Move the divider forward with every new receipt.
Paper color coding: Who gets which copy?
Multi-part books use color to route each copy to the right place:
2-Part (Duplicate) Books:
- White sheet (original): given directly to the customer as proof of purchase.
- Canary/yellow sheet (duplicate): stays bound in the book for merchant accounting.
3-Part (Triplicate) Books:
- White sheet (original): delivered to the customer.
- Canary/yellow sheet: sent to internal accounting or bookkeeping.
- Pink sheet: permanently attached inside the book for physical tax archives.
How to properly void a receipt for tax audits
When you need to void a receipt, resist the urge to tear the page out — removing a slip breaks the numerical sequence and immediately raises suspicion during an IRS or state tax audit. Instead, follow the correct correction procedure:
- Do not tear out any pages.
- Draw a large diagonal line across the face of the receipt.
- Write "VOID" clearly in bold ink on both the original and the duplicate copies.
- Staple the original customer copy back over the duplicate in the book, so an auditor can see that every number is accounted for.
If a customer already left with the original copy of a receipt you later need to void, note the correction on the retained duplicate and reference the replacement receipt number, so the two records clearly point to each other. The guiding principle is transparency: an auditor should be able to follow every number in the book, including the mistakes, without finding a single gap.
How long should you keep filled receipt books?
Retention rules exist for a reason. Small businesses and self-employed individuals should keep completed physical receipt books for at least 3 to 7 years, depending on local tax jurisdiction. As a general guide, IRS recommendations suggest keeping sales records for 3 years in standard cases, and up to 7 years if you ever need to support a loss claim. When in doubt, keep the longer window — storage is cheap compared to a disallowed deduction.
Store filled books somewhere dry and organized, ideally in date order, so a specific transaction can be located in minutes rather than hours. Many owners also photograph or scan completed pages as a digital backup; NCR paper can fade over several years, and a clear scan preserves the record even if the physical ink degrades. Running those scans through PDF OCR turns the images into searchable text, so you can locate any transaction by name or amount without flipping through the whole book. A simple habit of archiving each finished book with its date range on the cover turns years of receipts into a searchable, audit-ready trail.
Conclusion
Keeping a receipt book filled out correctly, page after page, is what turns a drawer of loose slips into an audit-ready record. Completing a receipt book well comes down to steady attention to itemized details, proper use of the protective cardboard backing, and strict adherence to sequential numbering. Keep your duplicate copies intact and your voids marked correctly, and tax season becomes a matter of flipping through an orderly book rather than reconstructing missing records. If you would rather issue digital receipts, OnlyDoc offers a library of free PDF templates you can fill out, save, and archive with the same audit-friendly discipline.

 Published Sep 16, 2026
  12 min read
  84 views